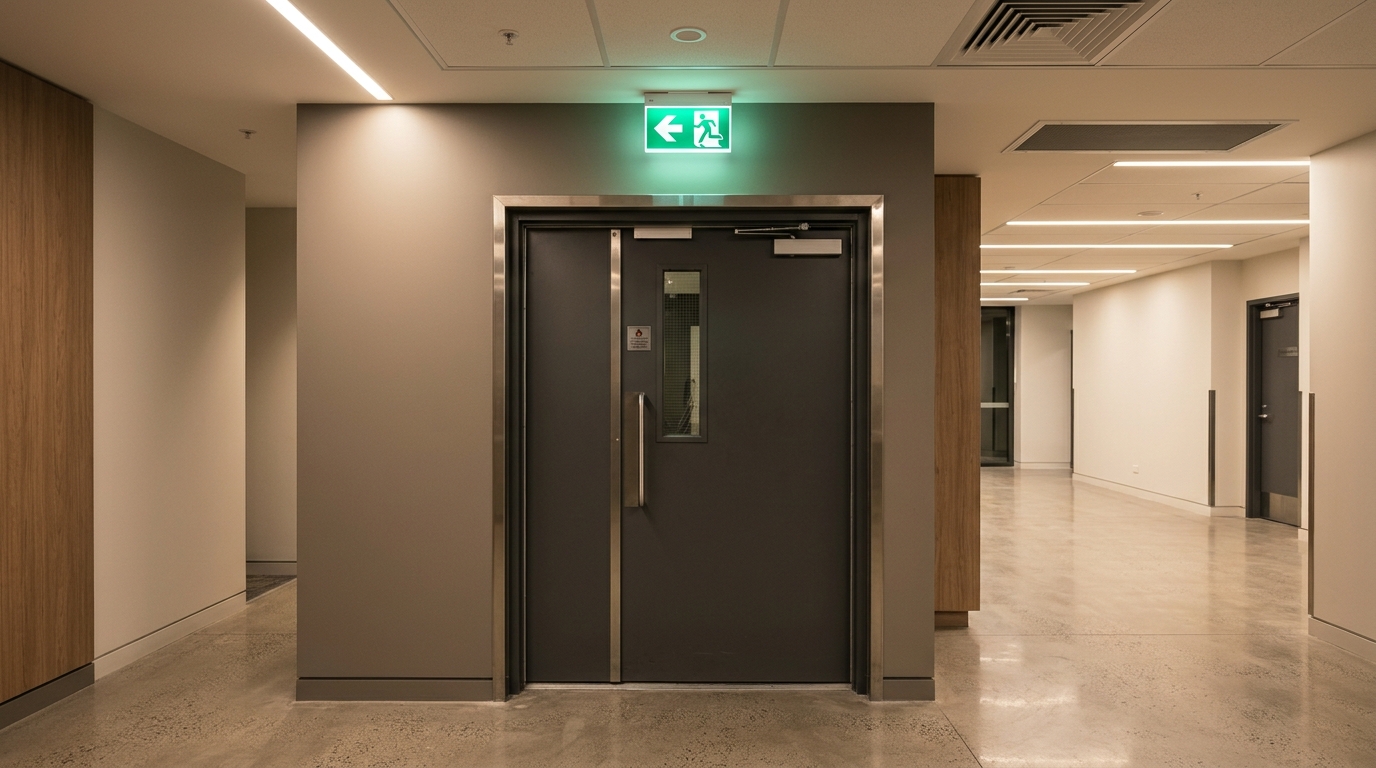
What This Article Covers
This guide explains how to inspect an emergency lighting system in a completed or near-completed building and how to produce findings that will hold up under review by the authority having jurisdiction (AHJ). It assumes you can read a lighting layout drawing and that you have access to the permitted drawings and the system’s test records.
If you are planning the layout during design, start with our lighting level rules of thumb guide. This article is the field counterpart: what to check on each luminaire, in what order, and what evidence to collect.
Free tool: Prefer to work through the checks on screen? Use the Emergency Lighting Inspection Checklist to record pass/fail results and copy a finding summary into your report.
General information only. Emergency lighting requirements vary by code edition, occupancy, and jurisdiction. Always confirm the governing requirements with the AHJ and the project’s approved documents.
Why Emergency Lighting Deserves a Dedicated Inspection
Emergency lighting looks fine in normal conditions: the lights are on, the exit signs glow, and the building appears correct. Problems only show up when normal power fails and the building has to be evacuated in the dark. Three issues cause most of the trouble:
- Untested luminaires. Codes call for periodic testing. When it is skipped, batteries degrade unnoticed.
- Placement drawn but not built. A luminaire meant to light a stair landing may be installed a few hundred millimetres off its position and light nothing useful.
- Missing records. Even when tests happen, results are often not documented, so there is no evidence the system worked.
The workflow below is designed to catch all three.
From the field: On office, hotel, and mixed-use projects submitted through Qatar Civil Defense (QCD) and Doha Municipality, emergency lighting was a frequent item at final inspection. The pattern was rarely “the lights don’t work.” It was “the lights work but are in the wrong place,” “the exit signs are lit but face the wrong direction,” or “the monthly test log is blank.”
Key Terms and Typical Requirements at a Glance
The values below are typical of NFPA 101 and the International Building Code (IBC) in the US, and of EN 1838 / EN 50172 in Europe and many other regions. Treat them as a reference, not a substitute for the adopted code.
| Item | NFPA 101 / IBC (typical) | EN 1838 / EN 50172 (typical) |
|---|---|---|
| Minimum duration | 90 minutes | 1 hour minimum; longer (often 3 hours) where evacuation is delayed or the building is re-occupied quickly |
| Escape route illumination | Average 1 fc (about 11 lux) initially, no point below 0.1 fc (about 1 lux) | Minimum 1 lux along the centreline of the route |
| Level at end of duration | Average 0.6 fc, minimum 0.06 fc | Minimum level maintained for the rated duration |
| Uniformity (max:min) | 40:1 | 40:1 along the centreline |
| Response time | Automatic on loss of normal power; generator-backed systems typically within 10 seconds | 50% of required level within 5 seconds, 100% within 60 seconds |
| Routine testing | Monthly functional test (30 seconds) and annual 90-minute test, with written records | Monthly brief function test and annual full-duration test, with a logbook |
Other terms you will see on drawings and in reports:
- Maintained luminaire: lit at all times, switching to battery on power failure. Non-maintained luminaire: lit only when normal power fails.
- Self-contained (unit) system: a battery in each luminaire. Central battery or generator system: a single power source feeding many luminaires.
- Escape route lighting: lights the path out. Open-area (anti-panic) lighting: lets people reach the route in large spaces. High-risk task area lighting: keeps hazardous processes safe during a failure.
Step 1: Confirm the Layout and Governing Standards
Start with paper, not the field. Before walking the building:
- Locate the emergency lighting layout in the permitted electrical set. It should show every emergency luminaire, exit sign, and directional sign, with type, location, mounting height, and circuit.
- Identify the governing standard. In the US this is typically NFPA 101 or the IBC with NFPA 70 and NFPA 111. In Europe it is EN 1838 and EN 50172 with local regulations. In Qatar, confirm the QCD requirements and the standards referenced in the approved submission.
- Cross-check against the egress plan. Luminaires must light the escape path, signs must be visible from it, and directional signs must lead to the exits.
A common documentation deficiency is a layout that shows luminaires on a regular grid (for example, every 5 metres) rather than at the positions the egress plan requires. A grid is a shortcut, not a design.
Step 2: Verify Luminaire Placement
Codes define the areas that must be lit, not a fixed spacing. Walk the egress path and confirm coverage at each of the following:
- Exit doors: a luminaire near each exit door, typically within 2 metres, on the egress side, including outside the final exit where the code requires it.
- Stairs: each flight and landing lit directly, so every step is visible.
- Changes of direction and intersections: corridor turns and junctions, where occupants can become disoriented.
- Changes of level: steps, ramps, and thresholds along the route.
- Fire and first aid points: extinguishers, manual call points, and first aid stations, so they can be found in an emergency.
- Other required locations: depending on the code, these can include lift lobbies, large or windowless toilet rooms, and plant rooms such as electrical, generator, fire pump, and fire command rooms.
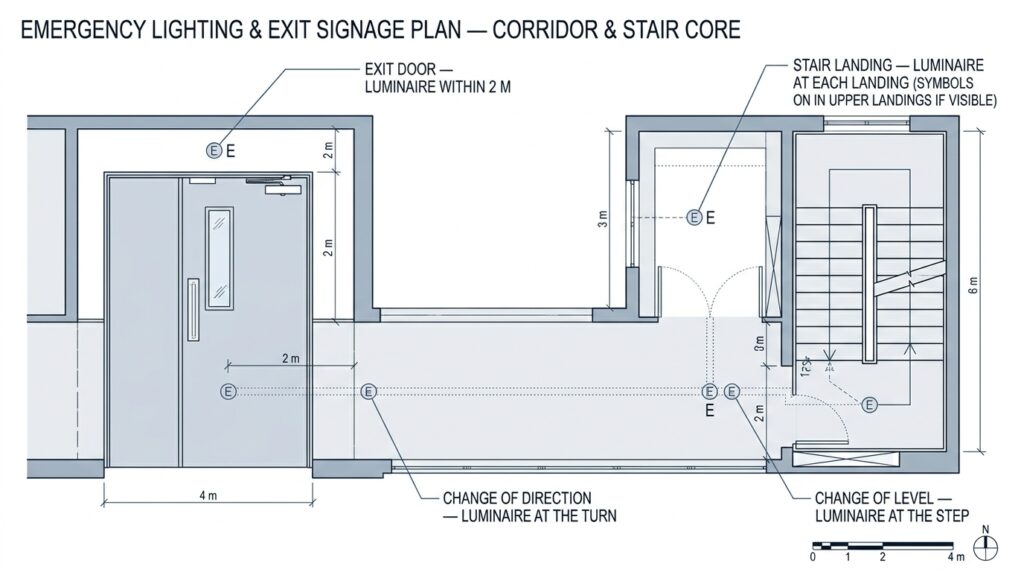
Also check the physical installation. Look for luminaires blocked by ducts, cable trays, or ceiling changes, units mounted at the wrong height, damaged or dirty lenses, and luminaires missing after ceiling or fit-out changes.
Step 3: Verify Exit Signs and Directional Signage
Exit signs and directional signs are part of the emergency lighting system and have their own checks:
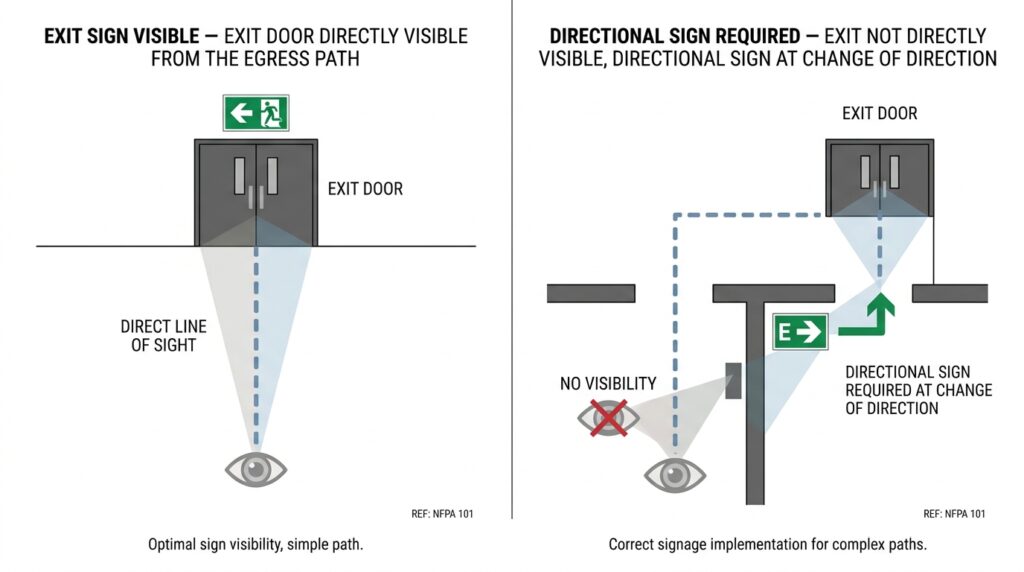
- Sign at every exit. Each exit door has a sign visible from the egress path, not hidden by an open door leaf, partition, or equipment.
- Directional signs. Where the exit is not directly visible, a directional sign is needed at each change of direction and decision point.
- Arrow and pictogram direction. Confirm every arrow points the right way. A lit sign facing the wrong direction is a misdirection.
- Viewing distance. No point on the route should be farther from a sign than its rated viewing distance. For typical listed internally illuminated signs under NFPA 101, this is 30 metres (100 feet) or the marked distance, whichever is less.
- Mounting height. Signs are commonly mounted around 2 to 2.5 metres above the floor. Follow the adopted code and the manufacturer’s listing.
- Illumination. Signs must be continuously lit (or otherwise visible, for example photoluminescent where permitted) and must remain visible during a power failure.
- Consistency. Use one sign style throughout. Mixing pictogram and text signs without reason confuses occupants.
Step 4: Verify Duration, Illumination Level, and Uniformity
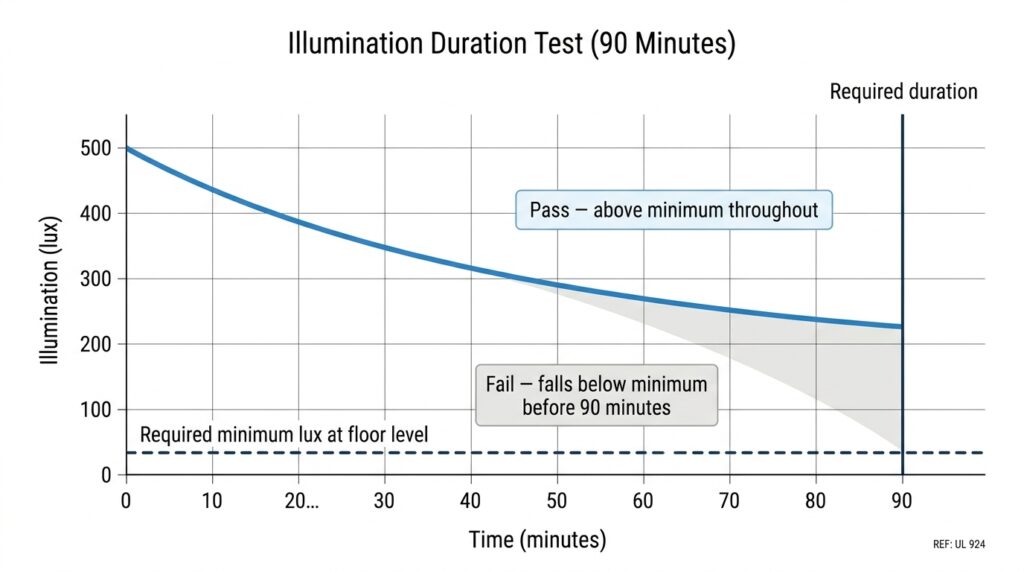
Duration. The system must operate for the required duration with normal power disconnected. Under NFPA 101 and the IBC this is 90 minutes. EN 50172 sets 1 hour as the minimum, with 3 hours specified for some premises. Confirm the project’s value from the approved documents. A system that runs for 30 minutes and fails does not comply.
Illumination level. Measure, do not assume. Use a calibrated lux meter held at floor level along the centreline of the route, with the cell facing up. Take readings at intervals along corridors and at stair landings, door approaches, and changes of direction. Take them on emergency power, in darkness, with normal lighting off and daylight excluded.
Uniformity. The ratio between the brightest and darkest points along the route should not exceed 40:1. A bright luminaire at one end of a corridor and darkness at the other is a deficiency even if the average passes.
Response time. Note how quickly the lighting comes on after power loss. Confirm it against the project standard.
Circuit and controls. Confirm that emergency luminaires come on if the local lighting circuit is interrupted (for example, a tripped breaker or a switched-off room), and that dimmers, occupancy sensors, or timers cannot keep them off.
Step 5: Verify Batteries, Charging, and Monitoring
Batteries are the component most likely to degrade between inspections.
- Type and capacity. The battery must match the luminaire’s specification and the required duration. The right physical size with the wrong capacity is a deficiency.
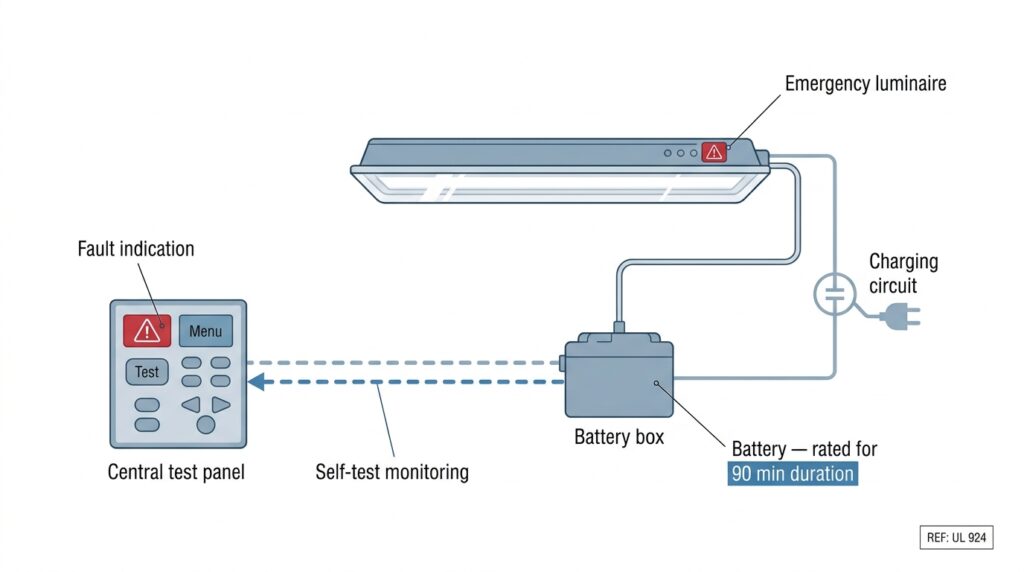
- Charging. Check that the charging circuit works and the charge indicator is on. A battery that is not fully charged at the start of a test produces a false failure.
- Self-test and monitoring. Where present, confirm that self-test is enabled, the monitoring reports correctly, and fault indications have been cleared. A self-test function disabled to avoid nuisance alarms is a deficiency.
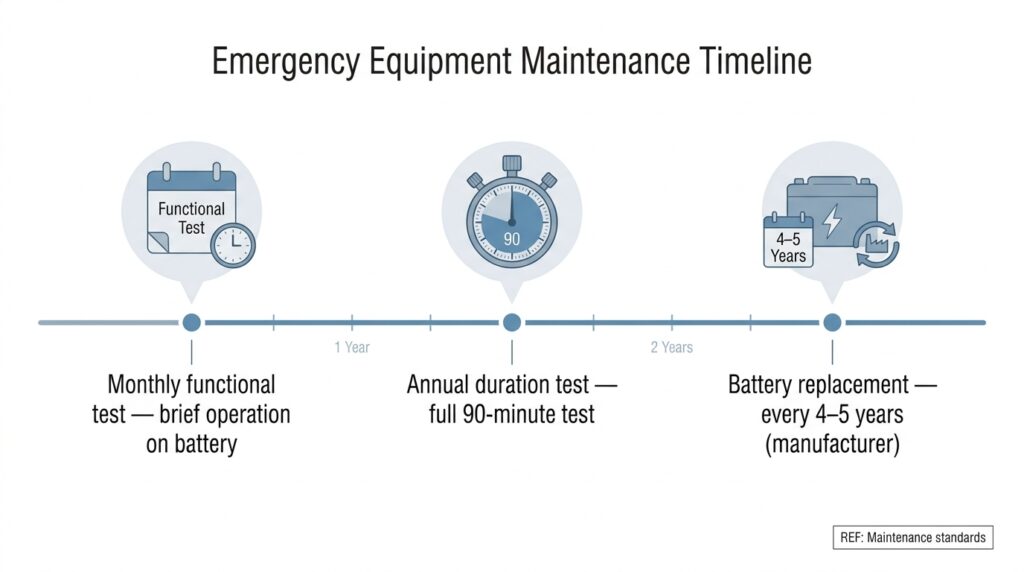
- Replacement records. Compare battery age against the manufacturer’s recommended service life. Sealed lead-acid batteries commonly need replacing every 3 to 5 years, while other chemistries last longer. Replace sooner if capacity tests show a decline.
- Central systems and generators. For central battery systems, check the cabinet, charger, ventilation, and room conditions. For generator-backed lighting, check the transfer arrangements and refer to the emergency power system inspection.
Step 6: Verify Test and Maintenance Records
Records are the evidence that the system worked on a given day and has been maintained since.
- Monthly functional test records: each luminaire briefly switched to battery mode, with failures reported and corrected. NFPA 101 specifies 30 seconds.
- Annual full-duration test records: the full rated duration, with confirmation that illumination remained adequate throughout.
- Deficiency log: each fault found, the corrective action, who did it, and when. A test without a deficiency log has no follow-through.
- Battery replacement records: dates and batteries fitted.
- Commissioning documents: as-built drawings, photometric calculations, and acceptance test records from handover.
- Maintenance contract: where an external contractor maintains the system, a copy showing scope, frequency, and provider.
For self-testing luminaires, keep the central or system-generated logs and check that they cover all luminaires.
How to Run a Safe Duration Test
- Schedule the test outside peak occupancy, and tell building management in advance.
- Check that the batteries are fully charged before the test. Recharge periods after a full discharge are commonly about 24 hours, so plan for the building to be without full emergency lighting protection during that time.
- Do not run the test during a period of higher risk, such as an event or live hot work.
- Keep a person with a torch at stairs and other critical areas during the test.
- After the test, restore normal power, confirm that charging has resumed, and record the results.
Inspection Checklist
Use this list as a field aid, or complete the same checks on screen with the free interactive checklist below.
- Permitted layout and governing standard identified
- Luminaires present at all required locations (doors, stairs, direction and level changes, fire and first aid points)
- Luminaires undamaged, clean, unobstructed, and correctly mounted
- Exit signs at every exit, with correct arrows and viewing distance
- Directional signs at every decision point
- Emergency lighting activates when local lighting is switched off or tripped
- Duration test completed for the full required time
- Floor-level lux readings meet minimum, average, and uniformity requirements
- Batteries correct, charged, and within service life
- Self-test and monitoring enabled and fault-free
- Monthly and annual test records current
- Deficiency log and corrective actions documented
Interactive version: The Emergency Lighting Inspection Checklist turns these checks into a pass/fail form covering all six steps. It accepts your measured duration and lux readings, gives an overall checklist result, and produces a summary you can copy into your inspection report or save as a PDF. It runs in your browser, and nothing you enter is stored or sent anywhere.
Common Mistakes That Undermine Inspections
- Checking that luminaires work, not where they are. A working luminaire in the wrong place does not protect the egress path.
- Running a short test instead of the full duration. A 5-minute test does not verify a 90-minute requirement.
- Measuring illumination on normal power. Readings must be taken on emergency power.
- Accepting a lit exit sign without checking its direction.
- Ignoring battery age.
- Skipping the records review. A system with no records is a system of unknown compliance.
- Treating self-test indicators as proof. Self-test confirms the unit’s function, not coverage or illuminance on the route.
Frequently Asked Questions
How long must emergency lighting last? Under NFPA 101 and the IBC, 90 minutes. Under EN 50172, a minimum of 1 hour, with longer durations (often 3 hours) for premises where evacuation may be delayed. Confirm with the AHJ.
How often should emergency lighting be tested? A brief functional test monthly and a full-duration test annually are the typical requirements. NFPA 101 specifies a 30-second monthly test and a 90-minute annual test, with written records.
What illumination level is required on an escape route? Under NFPA 101 and the IBC, an initial average of 1 foot-candle (about 11 lux) with a minimum of 0.1 foot-candle (about 1 lux) at any point. EN 1838 requires at least 1 lux along the centreline. Levels may decline toward the end of the rated duration, within code limits.
Are exit signs part of emergency lighting? Yes. Exit and directional signs are inspected as part of the emergency lighting and egress system, and must remain visible during a power failure.
Can emergency lighting be checked only by visual inspection? No. A visual check does not confirm duration, illumination level, or battery health. Those need a timed test and lux measurements.
Who is responsible for keeping the records? The building owner or their appointed representative is generally responsible for testing and keeping the records, even where a contractor does the work. Confirm the exact responsibility in the local code and the maintenance contract.
Summary
A fully compliant egress system can be undermined by emergency lighting that is in the wrong place, at the wrong level, or running on a degraded battery. The workflow is: confirm the layout, verify placement, verify signage, verify duration and illumination, verify batteries, and review records. Skipping any step leaves a gap that will only show itself during an emergency.
Ready to apply the workflow? Use the free online checklist to record your findings step by step.
Related Reading on ArchFieldGuide
- Lighting Level Rules of Thumb: Lux by Space Type — the design-stage illumination levels the emergency lighting system must support.
- Fire Escape Route Inspection: Width, Signage, and Obstruction Checks — the egress system the emergency lighting protects.
- How to Inspect a Building’s Exit Signs and Wayfinding System — the signage counterpart to this article.
- Fire Alarm System Inspection Workflow: Devices, Panel, and Zones — the alarm system that must coordinate with emergency lighting during evacuation.
- Emergency Power System Inspection: Generators and UPS — the upstream power supply that emergency lighting depends on.
- Corridor and Stair Width Verification: Design Intent vs. As-Built — the egress path width check that complements this inspection.
- Inspection Report Writing: How to Document Deficiencies Clearly — the documentation standard that makes findings defensible.
- From Inspection to Rectification: Tracking and Closing Deficiencies — what happens after a deficiency is identified.
About This Guide
This article is part of the ArchFieldGuide reference library, a practical, workflow-based resource connecting design decisions, utility sizing rules of thumb, and on-site verification for architects, engineers, and fire safety consultants.
The workflow described here reflects 20+ years of architectural practice across commercial, hospitality, institutional, healthcare, and residential projects in Qatar, the Philippines, and internationally, including Doha Municipality and QCD submissions and inspections for office buildings, hotels, malls, schools, clinics, and mixed-use developments. Emergency lighting verification has been part of construction administration and site supervision on projects ranging from mid-rise offices to a 40-storey office tower and large mixed-use developments.
To see the project portfolio behind this reference, visit the ArchFieldGuide project portfolio.
Disclaimer: This article provides general guidance and does not replace the adopted codes, the project’s approved documents, or the direction of the AHJ.