Tag: occupant-load

  • How to Calculate Occupant Load: Floor Area, Use Group, and Code Tables

    What This Article Assumes

    This guide is written for professionals who already work with the building code and need a reliable, repeatable method for establishing occupant load. It assumes you have access to the adopted edition of the International Building Code (IBC) in your jurisdiction, that you understand what an occupancy classification is, and that you are calculating occupant load for a real project—whether that is an egress analysis, a plumbing fixture count, a fire alarm zone plan, or a fire safety submission.

    If your immediate downstream task is restroom fixture counting, read this article first and then continue to our office toilet fixture count workflow, which builds directly on the occupant load you establish here.

    What this article adds is the method: how to break a building into the right zones, which floor area basis to apply, where mixed occupancies break the simple table lookup, and how to document assumptions so the calculation survives plan review and post-construction verification.


    Why Occupant Load Is the Most Consequential Number in the Building

    Occupant load is not a single calculation. It is a chain of decisions that drives almost every life safety and utility system in the building. Get it right, and the egress widths, stair capacities, exit sign counts, fire alarm zones, plumbing fixture counts, and ventilation rates all fall into place. Get it wrong, and the error propagates through every downstream discipline.

    A low occupant load assumption produces undersized corridors, too few exits, and non-compliant stairs. A high assumption produces oversized circulation, wasted floor area, and cost that the client notices at the pro forma stage. The number is consequential in both directions, which is why the workflow matters more than any single table factor.

    The IBC establishes the framework in Chapter 10, with the governing table being Table 1004.1.2 — Maximum Floor Area Allowances per Occupant. Everything in this guide ultimately traces back to that table and the definitions in Chapter 2.


    Step 1: Identify the Occupancy Classification of Every Space

    Before you can apply an occupant load factor, you need to know which use group each space belongs to. The IBC organizes buildings into occupancy groups—Assembly (A), Business (B), Educational (E), Factory (F), High Hazard (H), Institutional (I), Mercantile (M), Residential (R), Storage (S), and Utility (U)—and each group has subcategories that carry different occupant load factors.

    The practical workflow is to mark up the floor plans space by space and assign a use group to each. Three rules keep this step honest:

    Rule 1: Classify by actual use, not by the building’s overall label. An office building is a Business occupancy, but the conference center on the ground floor is Assembly, the cafeteria is Assembly, and the parking garage is Storage. The building’s primary classification does not override the classification of individual spaces.

    Rule 2: Watch the threshold for Assembly. Assembly occupancy is triggered when a space is designed for gathering 50 or more occupants (or 75 or more in some code editions, depending on whether the space is concentrated or unconcentrated). A 40-person training room stays Business. A 60-person training room becomes Assembly and brings with it a different set of egress and fire protection requirements. This threshold is one of the most frequently missed classifications in tenant fit-out reviews.

    Rule 3: Accessory spaces follow the principal use unless they trigger a separate classification. A small server room inside an office floor is accessory to Business. A 3,000-square-foot data center inside the same building may not be. The IBC’s accessory occupancy provisions allow spaces that are ancillary and limited in area to be classified with the main occupancy, but the limits are specific and should be checked on every project.

    From the Field: On large mixed-use submissions in Doha—including hotel and mall projects reviewed through Qatar Civil Defense—the classification disputes that delayed approval most often involved spaces that had drifted across a threshold during design development: a ballroom that grew past the Assembly threshold, a food court that became a distinct Assembly zone, or a back-of-house training room that was never re-checked after the program expanded. Assigning use groups early, and re-checking them at each design milestone, prevented most of these issues before submission.


    Step 2: Determine Gross Versus Net Floor Area

    The occupant load factor in Table 1004.1.2 is applied either to gross floor area or net floor area, and the distinction changes the result significantly.

    Gross floor area is the floor area within the surrounding exterior walls of the building, including interior walls, columns, corridors, restrooms, mechanical shafts, and other fixed elements. It is the area you would measure from the inside face of the exterior walls.

    Net floor area is the floor area within the walls of the specific space being classified, excluding fixed elements that occupants cannot use. For Assembly spaces, net area is typically the actual seating or standing area, not the full room including the stage, backstage, or service zones.

    The table tells you which basis applies to each use group. Business occupancy uses gross area at 150 square feet per occupant. Assembly without fixed seats (concentrated) uses net area at 7 square feet per occupant; unconcentrated uses net area at 15 square feet per occupant. Educational uses gross area at 20 square feet per occupant in classrooms.

    Applying the wrong basis is a common source of error. A designer who applies the net Assembly factor to an entire conference floor, including corridors and service areas, will overstate the occupant load. A designer who applies gross area to a concentrated Assembly space will understate it.


    Step 3: Apply the Correct Factor from Table 1004.1.2

    With the use group and area basis established, apply the factor from the adopted code table. The factors that come up most often in everyday practice are summarized below, but always confirm against your jurisdiction’s adopted edition, because factors are amended periodically.


    Use Group / Function Area Basis Factor (sq ft per occupant)
    Business (office) Gross 150
    Assembly — unconcentrated (tables and chairs) Net 15
    Assembly — concentrated (chairs only) Net 7
    Assembly — standing space Net 5
    Educational — classroom Gross 20
    Mercantile — sales floor Gross 60
    Storage — warehouse Gross 300
    Residential — dwelling units Gross 200 (per dwelling unit basis)

    The workflow for each space is simple arithmetic: divide the applicable area by the applicable factor, then round up to the next whole occupant. The code does not permit fractional occupants, and every fraction counts as a full person for egress and fixture purposes.

    A 4,500-square-foot open office floor plate at 150 gross yields 30 occupants. A 1,200-square-foot conference room with tables and chairs at 15 net yields 80 occupants. Note how the conference room, at roughly a quarter of the floor area, carries more than two and a half times the occupant load. This is the dynamic that makes Assembly spaces inside office buildings so consequential for core sizing.


    Step 4: Handle Mixed Occupancies and Accessory Spaces

    Most real buildings are not single-occupancy boxes. A mixed-use tower may contain Mercantile at the podium, Business in the office floors, Residential in the upper floors, and Storage in the basement. A hotel contains Assembly (restaurants, ballrooms, meeting rooms), Residential (guest rooms), Business (back offices), and Storage (back-of-house). Each zone is calculated separately and then totaled.

    The IBC provides two methods for handling mixed occupancies—the non-separated method and the separated method—and the choice affects how occupant load and egress are calculated. Under the non-separated method, the building is treated as the most restrictive occupancy for certain fire protection requirements, but occupant load is still calculated space by space. Under the separated method, each occupancy is provided with fire-resistance-rated separation and calculated independently.

    For occupant load purposes specifically, the practical rule is: calculate each space by its own use group factor, then sum the occupants for the building total. The total drives exit capacity, stair width, and other egress calculations. Individual space loads drive local egress widths, door widths, and fixture counts.

    Accessory spaces require a judgment call. The IBC allows spaces that are ancillary to the principal use and limited in area to be classified with the principal occupancy. The limits vary by occupancy pair and are specified in Section 508.2. A small copy room inside an office floor is clearly accessory. A 2,500-square-foot fitness center inside an office building may or may not qualify, depending on the code edition and the specific area limits. When in doubt, classify conservatively and calculate separately—the additional occupant load rarely changes the design outcome, but missing it can fail plan review.

    For mixed-use buildings where multiple occupancies share egress paths, our guide on occupant load for mixed-use buildings covers the interaction between zones in more detail.


    Step 5: Document Your Assumptions for Downstream Review

    The occupant load calculation is only useful if the next person in the chain can trace it. A calculation that lives only in a spreadsheet on the designer’s laptop will not survive plan review, construction administration, or a post-occupancy change of use.

    The documentation standard that professional practice expects includes:

    1. A space-by-space schedule identifying each room or zone, its use group, its floor area, its area basis (gross or net), the applied factor, and the calculated occupant load.

    2. A plan markup showing the boundaries of each calculation zone, so that a reviewer can verify the floor areas against the drawings.

    3. Notes on assumptions — where a space’s use was assumed, where a threshold was close, where a future fit-out might change the classification.

    4. A total occupant load for the building and for each floor, stated clearly on the life safety plans.

    This documentation is what makes post-construction verification possible. When a tenant later converts a storage room into a conference room, the verification inspector can compare the original assumptions against the new layout and identify the delta. Our guide on verifying occupant load post-construction covers that workflow in detail.


    Common Mistakes That Trigger Rework

    The occupant load errors that cause the most rework on real projects tend to fall into a small number of patterns:

    1. Applying gross factors to net-basis spaces. Using 150 gross for a conference room instead of the Assembly net factor understates the load by a wide margin.

    2. Missing the Assembly threshold. A space that grows past 50 or 75 occupants during design development changes classification and triggers new egress requirements.

    3. Forgetting to round up. Fractions count as whole occupants. A calculated 29.2 is 30.

    4. Treating the whole building as one use group. Mixed-use buildings require space-by-space calculation, not a single factor applied to the total floor area.

    5. Not updating the calculation after layout changes. Occupant load is a living document through design development, not a one-time schematic design exercise.

    6. Ignoring mezzanines and open-to-below areas. Mezzanines, balconies, and open floor areas above atriums have their own calculation rules and are frequently missed in early-stage calculations.


    The Number That Drives Everything Downstream

    Occupant load is the input to almost every life safety and utility system in the building. Egress width, stair capacity, exit count, door width, corridor width, plumbing fixture count, fire alarm zoning, and ventilation rates all trace back to it. A calculation that is done carefully, documented clearly, and revisited at each design milestone protects the project from the change orders and plan review delays that follow an error discovered late.

    The workflow is: classify each space, confirm the area basis, apply the adopted factor, round up, sum by zone, document the assumptions, and re-check at every milestone. Follow that sequence, and the rest of the life safety and utility design has a reliable foundation.


    Related Reading on ArchFieldGuide

    • How Many Toilets Does an Office Building Need? Occupant Load to Fixture Count — The direct downstream application of this calculation for office projects.

    • Occupant Load for Mixed-Use Buildings: How to Handle Different Areas — Extending this workflow across multiple occupancy groups sharing egress.

    • Corridor Width Rules of Thumb: By Building Type and Occupancy — How occupant load translates into egress corridor dimensions.

    • Staircase Width Rules of Thumb: Egress, Capacity, and Comfort — The vertical egress counterpart to corridor width.

    • Door Width Rules of Thumb: Accessibility, Egress, and Daily Use — How occupant load and egress capacity determine door widths.

    • How to Verify Occupant Load Post-Construction: Layout and Use Changes — The field verification counterpart to this calculation.

    • How to Plan Building Circulation: Public, Private, and Service Routes — How egress and circulation planning interact at the layout stage.

    • Fire Alarm System Inspection Workflow: Devices, Panel, and Zones — How occupant load informs fire alarm zoning and device placement.


    About This Guide

    This article is part of the ArchFieldGuide reference library—a practical, workflow-based resource connecting design decisions, utility sizing rules of thumb, and on-site verification for architects, engineers, and fire safety consultants.

    The occupant load method described here reflects 20+ years of architectural practice across commercial, hospitality, institutional, healthcare, and residential projects in Qatar, the Philippines, and internationally—including Doha Municipality and Qatar Civil Defense (QCD) submissions for office buildings, hotels, malls, schools, clinics, and mixed-use developments. Occupant load calculation underpins every fire safety package and egress analysis in that portfolio, from mid-rise office buildings to large mixed-use developments and institutional campuses.

    To see the project portfolio behind this reference, visit the ArchFieldGuide project portfolio.
  • How Many Toilets Does an Office Building Need? Occupant Load to Fixture Count

    How Many Toilets Does an Office Building Need? Occupant Load to Fixture Count

    The Short Answer

    For a typical office (Group B) under the International Plumbing Code (IPC), the minimum is one water closet per 25 occupants for the first 50, then one per 50 after that, with lavatories at one per 40 for the first 80, then one per 80. The IPC assumes occupants are split 50/50 between men and women unless you can document otherwise. A 120-person office floor therefore needs about three water closets and two lavatories for each sex.

    That is the quick version. The rest of this guide covers what it hides: how to establish the occupant load correctly, where conference rooms change the math, how urinal substitution works, what accessibility adds, and how to verify the result in the field. You can also run your own numbers with our free Office Restroom Fixture Calculator, introduced in Step 2.

    What This Article Assumes

    This guide is written for design and construction professionals who already understand the code framework. It assumes you know what an occupancy classification is, that you have the adopted editions of the International Building Code (IBC) and IPC for your jurisdiction, and that you are calculating fixture counts for a real project. If you need a refresher on how occupant load is established, start with our companion article on occupant load calculation.

    What this article adds is the workflow: the sequence of decisions, the assumptions that are easy to get wrong, and the field checks that catch errors before they become change orders.

    A note on editions: table numbers, section numbers, and some ratios change between code editions and local amendments. The values below reflect the commonly published IBC/IPC provisions for Business occupancy. Always confirm against the edition your authority having jurisdiction (AHJ) has adopted.

    Why Fixture Counts Get Caught Late

    You have the core layout locked. The floor plates are efficient. The elevators are sized. Then the plumbing engineer sends a markup: the restroom count is wrong. A chase wall has to shift, a stack has to relocate, and the tenant improvement budget absorbs a change order that a fifteen-minute calculation at schematic design would have avoided.

    Fixture counting sits at the intersection of code compliance, construction cost, and leaseable area. Too few fixtures fails inspection. Too many burns square footage that could have been a conference room or a corner office.

    Step 1: Establish the Occupant Load First

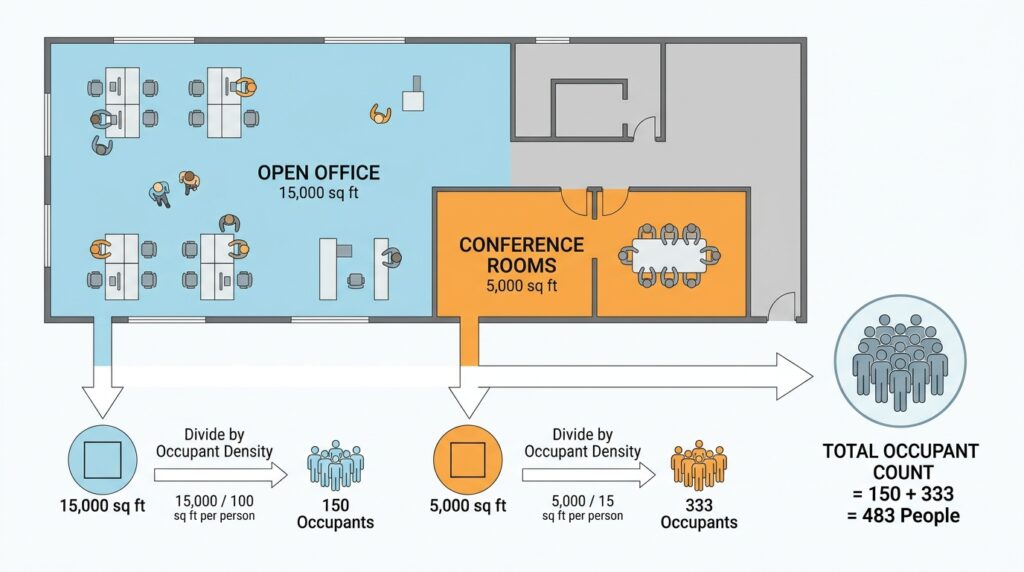
    Diagram showing office floor plate divided into Business and Assembly occupancy zones with occupant load calculations

    The most common error in fixture counting is starting with the plumbing code instead of the building code. The IPC tells you how many fixtures you need per occupant. It does not tell you how many occupants you have. IPC Section 403 directs you to the IBC for that number, which comes from the occupant load factor table in IBC Chapter 10 (Table 1004.5 in recent editions; Table 1004.1.2 in the 2015 IBC).

    For Business occupancy, the factor is 150 gross square feet per occupant. Earlier editions used 100 gross; the 150 figure appeared in the 2015 IBC. Older templates and firm standards still carry the 100 figure, so check your edition.

    Here is where judgment replaces table lookup. The IBC assigns occupant load by the function of each space, not by one blanket factor for the whole floor. Spaces inside an office suite commonly fall into these categories:

    Space Typical IBC factor
    Open office, private offices, reception, circulation, restrooms 150 gross (Business)
    Conference rooms and large break rooms with tables and chairs 15 net (assembly, unconcentrated)
    Training or meeting rooms with chairs only, no tables 7 net (assembly, concentrated)
    Standing-room or reception areas 5 net
    Classroom-style training rooms 20 net
    Commercial kitchens 200 gross

    Net means the actual usable floor area of the room, excluding walls, columns, and fixed furnishings. Gross means the full area within the exterior walls of the zone.

    Occupancy classification versus occupant load factor. These are two different questions. A small conference room (under 750 square feet) that is accessory to an office is generally classified as Group B, not Group A, but its occupant load is still calculated using the assembly-type factor for what happens in the room. A large conference or event space (50 or more people) is a true assembly occupancy and may carry its own, higher fixture ratios under IPC Table 403.1. Confirm the classification with your code consultant or AHJ at schematic design.

    A practical workflow:

    1. Divide the floor plate into functional zones. Business areas on a gross basis; conference, training, and break areas on a net basis.
    2. Apply the correct factor to each zone.
    3. Sum the occupants. This is the design occupant load for plumbing purposes.
    4. Round up. Occupant counts are whole people.

    From the field: On mid-rise office projects in Doha, including a G+M+6 building delivered through Doha Municipality approval, the most common occupant load dispute during Qatar Civil Defense (QCD) fire safety review was not the open office floor plate. It was the conference and training rooms, which had been calculated on a gross basis out of habit. Reviewing those spaces on a net basis before submission eliminated the rework. Local codes differ from U.S. model codes, but the lesson holds: calculate each space by its function.

    Aerial view of Doha office building district representing real-world project experience

    Step 2: Apply the Fixture Ratios

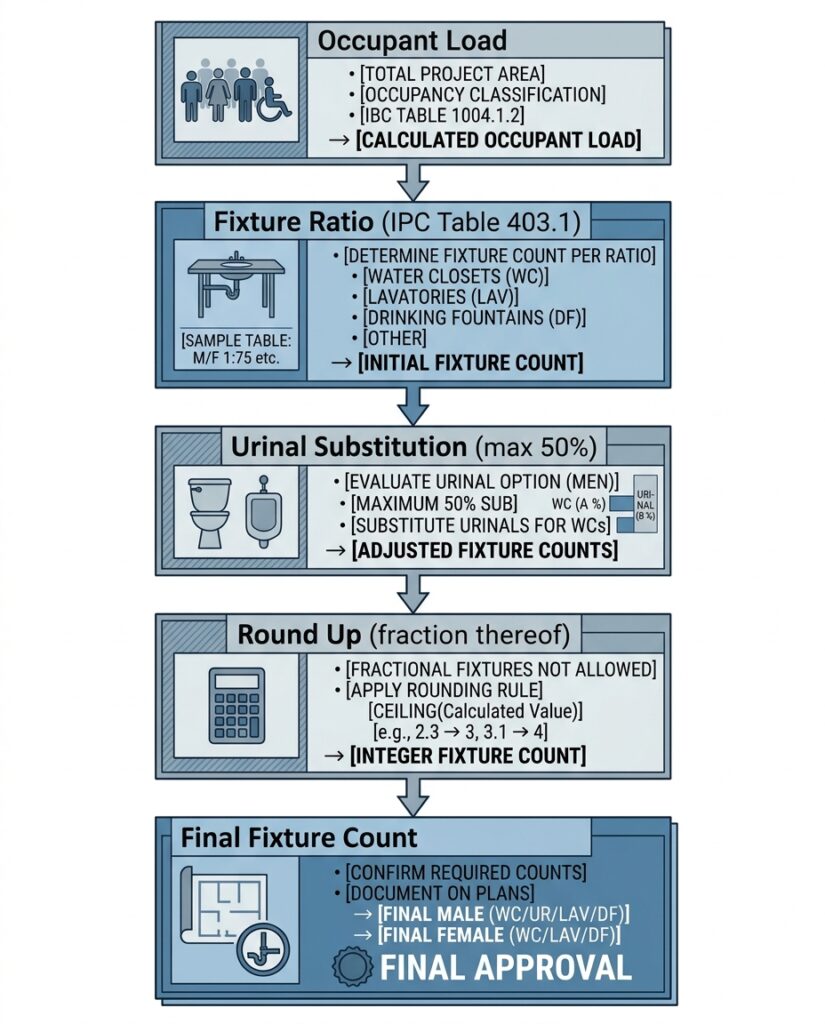
    Flowchart showing occupant load to fixture ratio to urinal substitution to final fixture count

    Once the occupant load is set, IPC Table 403.1 provides the minimum fixtures. For Business occupancy, the commonly published ratios are:

    Fixture Ratio
    Water closets (men and women) 1 per 25 for the first 50 occupants; 1 per 50 for the remainder
    Lavatories (men and women) 1 per 40 for the first 80 occupants; 1 per 80 for the remainder
    Drinking fountains 1 per 100 occupants
    Service sink 1 per building

    The IPC divides the total occupant load 50/50 between men and women unless you provide data showing a different ratio. The ratios apply to each sex separately. Some jurisdictions have adopted all-gender or single-user provisions; where they apply, the calculation method changes, so check local amendments. Also confirm whether your edition allows an alternative drinking-water provision, such as bottle-filling stations, in place of fountains.

    Worked Example

    Take a 20,000-square-foot office floor.

    Scenario A: Business area only (120 occupants)

    • 18,000 sf of Business area at 150 gross: 18,000 / 150 = 120 occupants.
    • Split 50/50: 60 men, 60 women.
    • Water closets per sex: first 50 needs 2 (1 per 25), the remaining 10 needs 1 (fraction of 50). Total 3.
    • Lavatories per sex: 60 persons at 1 per 40 needs 2.

    Scenario B: Add a 2,000 sf conference suite (1,500 sf net at 15 net)

    • Conference occupants: 1,500 / 15 = 100.
    • Total: 120 + 100 = 220 occupants; 110 men, 110 women.
    • Water closets per sex: 2 for the first 50, then 60 remaining needs 2 (60/50, rounded up). Total 4.
    • Lavatories per sex: 2 for the first 80, then 30 remaining needs 1. Total 3.

    Adding one conference suite moved the floor from 3 to 4 water closets and from 2 to 3 lavatories per sex. That is the kind of change that moves a chase wall.

    Some AHJs will consider that conference attendees are the same people already counted as office workers. Do not assume this. If you intend to rely on it, get the AHJ’s position in writing at schematic design.

    Try It: Office Restroom Fixture Calculator

    Use the calculator to reproduce the scenarios above or test your own floor plate. Enter 18,000 sf of Business area with no assembly area, then add 1,500 sf of conference space at 15 net to see the fixture count change. It also applies the urinal substitution limit and adds drinking fountains and the service sink.

    Open the Office Restroom Fixture Calculator

    The calculator is an estimating aid, not a code determination. Verify the results against your adopted code edition.

    Step 3: Three Adjustments the Table Does Not Highlight

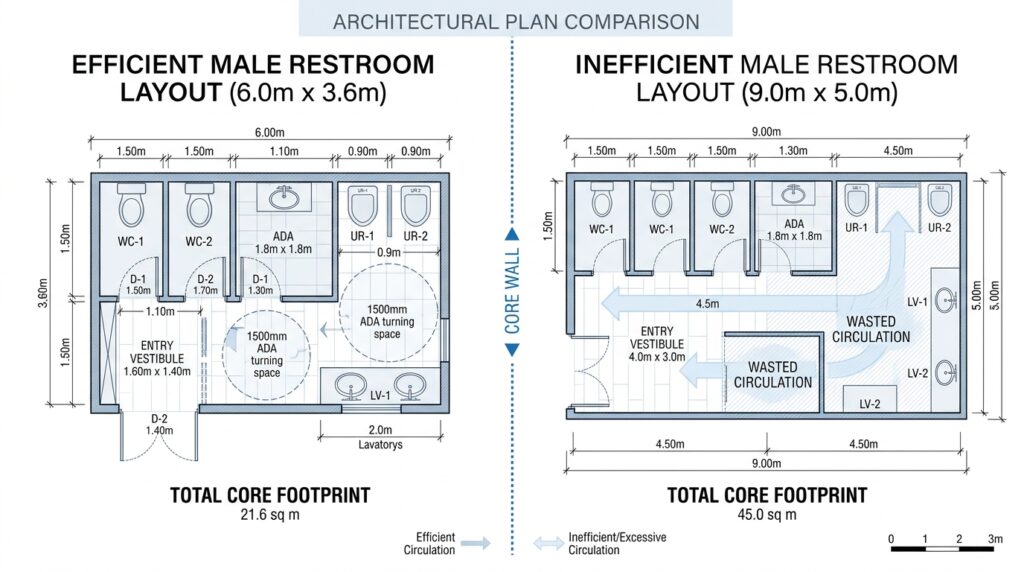
    Side-by-side comparison of efficient and inefficient office restroom layouts showing square footage differences

    Urinal substitution. Where urinals are provided in the men’s room, they may replace a portion of the required water closets. For Business occupancy the water closet count generally cannot be reduced below 50 percent of the requirement. In Scenario A, the men’s room requires 3 water closets, so at least 2 must remain (half of 3, rounded up); one urinal may take the place of the third. In Scenario B, the men’s room requires 4, so the minimum is 2 water closets plus up to 2 urinals. Assembly and educational occupancies use a higher floor (67 percent). Confirm the percentage in the urinal section of your adopted IPC.

    Separate facilities by sex, and employee versus public. The IPC generally requires separate facilities for each sex, with exceptions for small occupant loads and for dwelling units. The threshold for that exception varies by edition, so check yours. Customers, patrons, and visitors must be provided with public toilet facilities in spaces intended for public use, but employee facilities may be combined with public facilities. In a multi-tenant office building, core restrooms typically serve all tenants on a floor. In a single-tenant building with a public-facing lobby, consider whether the ground-floor facilities serve visitors and how that interacts with security and access control.

    The “or fraction thereof” rule. Each ratio means one fixture for the stated number of persons or any fraction of it. If one sex has 51 persons, the first 50 are covered by two water closets and the 51st requires one more fixture under the 1-per-50 tier. Round up at every step, per sex, per fixture type.

    Step 4: Accessibility Adds Requirements, Not Just Clearances

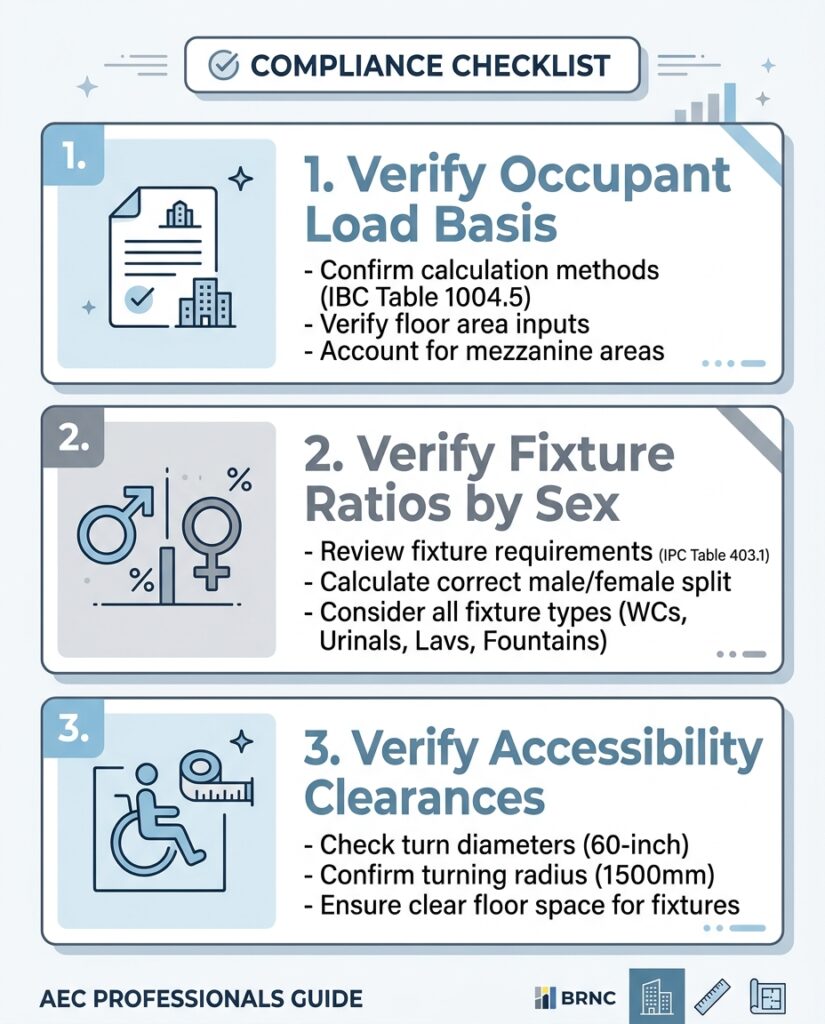
    Checklist graphic showing three field verification steps for office restroom fixture counts

    A fixture that a wheelchair user cannot approach is not a compliant fixture. In the United States, accessibility requirements come from the ADA Standards for Accessible Design and the IBC’s reference to ICC A117.1. Key points for office restrooms:

    • Every toilet room needs an accessible water closet, usually in a wheelchair-accessible compartment. A common compartment is about 60 inches wide and 56 to 59 inches deep, depending on whether the water closet is wall-hung or floor-mounted.
    • Where six or more water closets are provided in a toilet room, an additional ambulatory-accessible compartment (with grab bars on both sides) is also required.
    • Where urinals are provided, at least one must be accessible, with the required clear floor space and mounting height.
    • Lavatories: at least one accessible lavatory with knee and toe clearance, and accessories mounted within reach range.
    • Entry and turning space: a 60-inch turning circle (or T-turn) inside the room and a compliant door clearance on both sides.

    Accessible fixtures count toward the required total. They are not extra. But the larger footprint of an accessible compartment is why the area estimates in Step 6 are bigger than a simple fixture count suggests.

    Step 5: Location, Distance, and Other Requirements

    The fixture count is only part of what the plumbing code requires. Check these items too:

    • Location and travel distance. The IPC limits how far occupants must travel to reach required facilities (commonly 500 feet) and how many stories above or below the space served they may be located. Confirm the limits in your edition. In multi-tenant buildings, access should not require passing through another tenant’s space.
    • Fixture clearances. Typical IPC minimums include 15 inches from the centerline of a water closet to a side wall or partition, 30 inches center to center between adjacent fixtures, and 21 inches clear in front.
    • Ventilation. Toilet rooms require mechanical exhaust under the International Mechanical Code (or an equivalent local requirement). Coordinate shafts and ceiling space early.
    • Drinking fountain and service sink locations. These are easy to forget until the core is nearly drawn. A mop sink needs a closet with floor drain and ventilation.
    • Water-efficiency limits. Jurisdictions and green building programs often set maximum flush volumes, which affects fixture selection and pipe sizing.
    • Lactation rooms and related provisions. Some jurisdictions require lactation spaces that are not toilet rooms. They do not count toward fixture totals but still need floor area near the core.

    Once the fixtures are counted, pipe sizing follows from fixture units. See our guide on plumbing demand and fixture units.

    Step 6: Convert Fixture Count to Floor Area

    The number of fixtures is half the answer. The other half is whether they fit in the core without consuming leaseable area the pro forma cannot support.

    Typical planning figures (verify with your layout):

    • An accessible water closet compartment: roughly 60 inches wide and 56 to 60 inches deep.
    • A two-station lavatory counter: approximately 60 to 72 inches of linear run, plus circulation clearance behind.
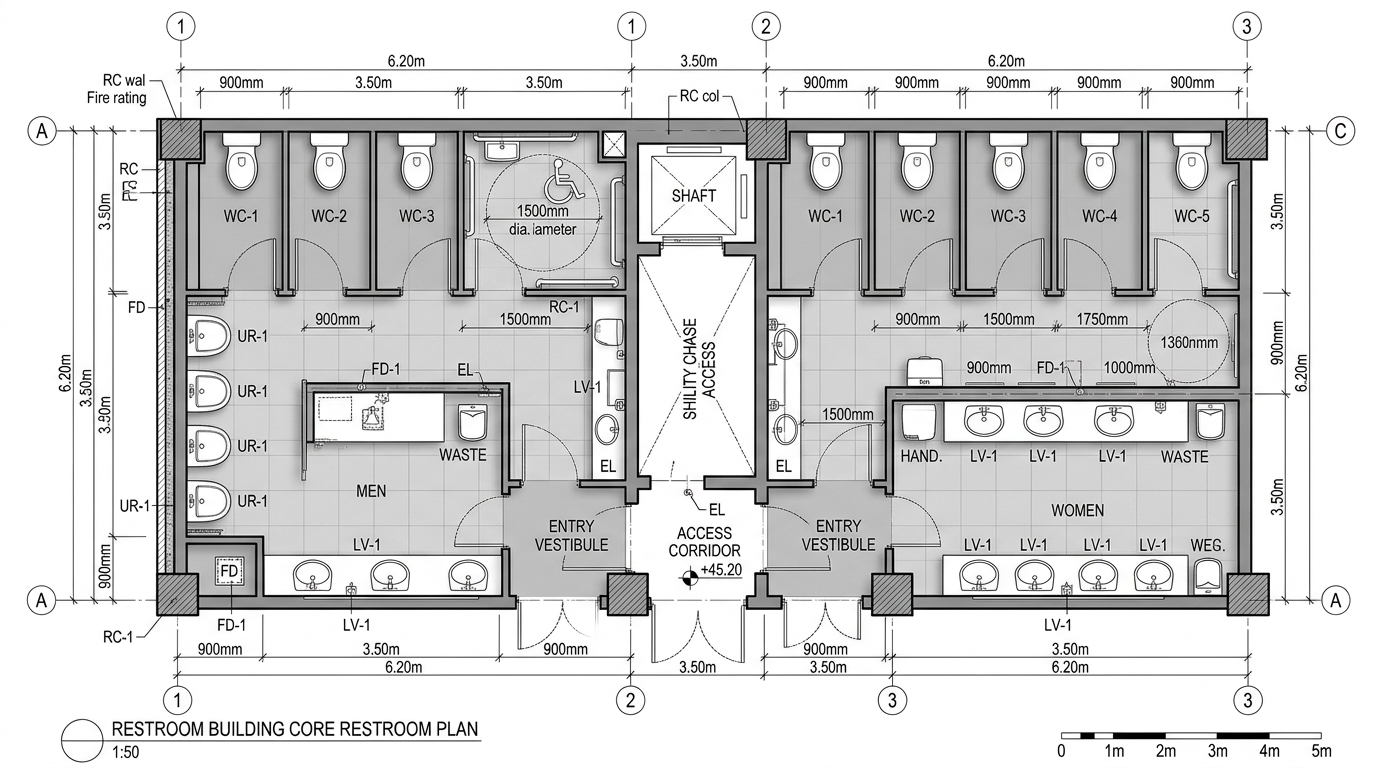
    • A men’s room with two water closets, two urinals, and two lavatories: about 180 to 220 square feet including the entry vestibule.
    • A women’s room with three or four water closets and two or three lavatories: about 200 to 260 square feet.

    For a 20,000-square-foot floor with a design occupant load around 150, total core restroom area commonly lands between 400 and 500 square feet for both sexes, roughly 2 to 2.5 percent of the gross floor area. If your layout shows 600 square feet for the same floor, you are either over-providing fixtures (often from using the old 100-square-foot factor) or the layout is inefficient: oversized vestibules, double-loaded runs, or plumbing walls that do not align.

    A fixture count that meets code but yields a cramped restroom is a leasing problem. A count that exceeds code by 30 percent is a floor-area problem. The sweet spot is usually within about 10 percent of the code minimum, with layout efficiency supplying the perceived quality. To see how the restroom block integrates with stairs, elevators, and vertical services, read our guide on building core design.

    Step 7: Field Verification Before Fixtures Are Set

    Inspection is more than counting toilets against a drawing. Three checks catch most deficiencies.

    1. Verify the occupant load basis. Confirm that the fixture count on the permitted drawings was calculated from the actual use of each space. If a tenant improvement converted a storage room into a conference room without updating the occupant load, the building may now be non-compliant. This is where many buildings fail quietly.
    2. Verify the ratios by sex. Count water closets in the men’s and women’s rooms separately. Apply the ratios to the 50/50 split. Confirm that urinal substitution did not exceed the permitted percentage. A men’s room with one water closet and three urinals is non-compliant if the requirement was four water closets, because at least two must remain.
    3. Verify accessibility. Check turning space at the entry, clearance beside the water closet, knee clearance at the lavatory, grab bar locations, and accessory mounting heights. These deficiencies surface in accessibility inspections long after the rough-in is closed.

    Our inspection guide, linked below, covers the paperwork, drawing comparison, and physical measurement steps in detail.

    Common Mistakes That Trigger Rework

    • Using the old 100-square-foot occupant factor. Check the adopted edition on every project.
    • Calculating conference rooms at the Business factor. Meeting and break spaces drive occupant load far more than their floor area suggests.
    • Forgetting to round up. A fractional fixture requirement is still a fixture.
    • Over-substituting urinals. The substitution cap is a hard limit.
    • Treating accessible fixtures as extras. They count toward the total, but they drive the footprint.
    • Ignoring tenant changes. A later conversion to a training room, call center, or denser seating plan can raise the occupant load beyond what the original fixture count supports.
    • Copying ratios from a different code. The Uniform Plumbing Code and many national codes use different tables.

    If You Are Outside the United States

    The workflow in this guide (occupant load first, fixture ratio second, layout third, verification last) applies anywhere, but the numbers do not. The Uniform Plumbing Code, the National Plumbing Code of the Philippines, Qatar’s municipal and Civil Defense requirements, and other national or local standards each have their own occupant density factors and fixture tables. Use this article for the method and the local code for the figures.

    Frequently Asked Questions

    How many toilets does an office with 50 employees need? With a 50/50 split, that is 25 men and 25 women, which needs one water closet and one lavatory per sex under the commonly published Business ratios, plus accessibility requirements. Many jurisdictions also have small-occupancy exceptions that permit a single unisex room.

    Do I count employees and visitors together? The occupant load used for fixture counts includes everyone the IBC counts for the space, so visitors and conference attendees are included wherever the code counts them.

    Can I replace water closets with urinals in an office? Yes, in the men’s room, up to the limit set in your adopted IPC (generally 50 percent of required water closets for Business occupancy).

    Are single-user restrooms allowed to count? In most adopted codes, yes. Single-user and family or assisted-use toilet rooms can usually count toward the required fixtures for each sex. Check local amendments for how they are credited.

    Does tenant improvement work trigger a new fixture count? Usually yes, if the work changes use, layout, or occupant load. Confirm with the AHJ.

    The Number That Matters

    The final fixture count is a record of assumptions: the occupant load factors you chose, the Business and Assembly zones you drew, the male/female split, the urinal substitution, and the round-up at each step. Write those assumptions on the plumbing drawings. When a tenant asks for a conference-room conversion three years later, the next engineer will need to know why the core has the count it has.

    The workflow: occupant load first, fixture ratio second, layout efficiency third, field verification last. Skip any step, and the restroom becomes the room everyone wishes they had planned better.

    Related Reading on ArchFieldGuide

    Grid of article thumbnails for related ArchFieldGuide reference articles

    • How to Calculate Occupant Load: Floor Area, Use Group, and Code Tables. The foundation for every fixture count.
    • Office Building Design Workflow: From Site Constraints to Core Layout. How the restroom block fits into the floor plate strategy.
    • How to Design a Building Core: Stairs, Elevators, and Services in One Zone. Integrating plumbing chases with vertical circulation.
    • Toilet Fixture Counts for Restaurants: A Step-by-Step Calculation. The same workflow with different ratios and higher density.
    • How to Verify Toilet Fixture Counts Against Design and Code. The field inspection counterpart to this article.
    • How Many Toilets Does a School Need? Rules of Thumb and Code Baselines. How educational ratios compare to office standards.
    • Plumbing Demand Rules of Thumb: Fixture Units and Pipe Sizing. Where pipe sizing begins once fixtures are counted.
    • How Many Toilets Does a Hotel Need? Restroom Provision by Star Rating. Hospitality ratios follow different logic, but the workflow is the same.

    About This Guide

    This article is part of the ArchFieldGuide reference library, a practical, workflow-based resource connecting design decisions, utility sizing rules of thumb, and on-site verification for architects, engineers, and fire safety consultants.

    The workflow reflects 20+ years of architectural practice across commercial, hospitality, institutional, healthcare, and residential projects in Qatar, the Philippines, and internationally, including Doha Municipality and Qatar Civil Defense (QCD) submissions for office buildings, hotels, malls, schools, clinics, and mixed-use developments. The office building experience behind this guide includes mid-rise and high-rise projects ranging from a G+M+6 office building to a 40-storey tower in Doha’s Dafna district, each requiring full fire safety packages and fixture coordination through approval.

    See the ArchFieldGuide project portfolio for the work behind this reference.

    Disclaimer: This article is general educational guidance and is not a substitute for the adopted codes, local amendments, or the judgment of a licensed design professional. Code requirements vary by jurisdiction and edition. Always confirm requirements with your authority having jurisdiction.